Tuesday 10 December 2013

Post Game Engines: Gamma Gears Analysis


This semester, we had one class in which we as students would be learning more in depths ways to program using engines.  This class was Game Engine Design and Implementation.  At the start of this class, we were introduced to Ogre and Havok and were given full use of these tools in the TwoLOC engine provided by our Teaching Assistant Saad.  Now, my team had created a great engine last year and were slightly upset that we were not able to transfer it over to this years GDW project.  After coming to terms with the fact however, we approached our Doctor Hogue, about possibly taking on something more challenging and unique in comparison to everyone else.  We did not dislike the great drawing abilities of Ogre, or the incredible physics provided by Havok, we just wanted to take on a different approach.  So, in response Dr. Hogue provided use with the Phyre engine that Sony uses on their systems.  Needless to say, we were very excited at the possibilities that were provided by this engine.  

After examining the code structure of the sources provided, and playing around with included level editor, our team started to formulate ideas as to what type of game we hoped to create.  I personally suggested a survival horror game, but the team discarded the idea rather quickly.  Then we stumbled upon the idea of possibly creating a isometric 3D arena brawler game.  After some ideas were thrown around and we came up with a general concept, Gamma Gears was born.  


Now we knew as a team that creating this game with the Phyre engine would not be an easy task.  Since the engine is very focused towards being used by those would helped design the engine itself, we found that it was difficult to find documentation through our search of the assets.  However, we were fairly confident that our programmer James would be able to dissect the assets and get us to a working prototype.  While James was working on figuring out how we would use the engine, Bobby, Vincent and I got to work on creating the assets needed in the game.  This required many stages from concept art, to modelling, then to rigging and texturing the models.  By this point, James was able to get models loading into the engine, so it was time to start animating the models.

The concept of animating for the Phyre engine was very similar to how we would have accomplished the task with TwoLOC, however there were some slight differences worth noting.  In the same fashion as previous years, the characters animation can be set using keyframe animation in Maya.  Whats different about getting these animations to Phyre however, is when the animated model is exported.  Included with our version of Phyre was a plug-in for Maya named the Collada exporter.  What this exporter does, is instead of exporting a standard obj. or maya binary file, Collada exports our animated models as a Phyre compatible .dae file format.  From here, we needed to ensure that our models were being exported to a location that Phyre could work with.  We found that the easiest location for our purposes was the contained Media folder in our Phyre folders.  Once this had been discovered, we as a team were able to implement our main character Alex into the scene.  There was an issue however, as Alex would only sit in his idle position as we had not character controller set up for our asset.  This is when we as a team realized how useful the Lua included scripts in the Phyre engine would be.

Alex in his idle stance in our scene
After the group spent some time reviewing the included Lua scripts in the Phyre sub folders, we realized that we had a choice to make when it came to make our character move around the game space.  Our first choice was to attempt to use the included Character Controller lua script that provided all of the functionality we were looking for in terms of movement, however the script was lacking collision detection.  After searching for some sort of collision script to use, we were unable to locate anything that may assist us, so we attempted to implement raycasting techniques that we had implemented in our game last year.  These techniques also ended up failing as we tried to implement them.  That is when we stumbled across the Physics Character Controller in the media scripts.  This controller allowed us to control everything from velocity to jump height, as well as gravity and the size of the collision capsule that was now attached to the character.  We were very excited as we now had a fully animating character!  However, the character was animating across an empty game world.  So we as a team got to work putting together our scene.

Alex with the physics controller implemented

The Phyre level editor is one of the most fantastic assets for constructing scenes for our levels, as it works in a similar fashion to Maya.  Although we constructed the bulk of the scene in Maya, after implementing it into the Phyre level editor, we realized that micro changes needed to be made to allow for level fluidity and function.  In other engines, this would require movement back and forth between Maya and Phyre, but the level editor allowed us to change and test these options on the fly.  After some hard work, we now had our character animating within a scene! 

A screen shot of our scene in the early stages of development!

Our next gameplay focus could not have been more perfectly timed, as it tied directly in with the homework assigned for the class.  This was of course the trigger system that we had been in need of since production began.  Since our game have different power-ups that the character needs to collect in order to become stronger and faster, we needed some form of triggering to occur to signify that the item needs to disappear from the screen.  How this works in the engine involves the use of included lua trigger reciever and quarrys scripts, as well as trigger bounding boxes that are also provided in the engine.  The first step is to link the trigger receiver to the bounding box that is created around the object we wanted Alex to collect.  From this point, we are able to add the quarry to Alex's physical collision body.  This allows the engine to recognize not only when something has collided with the trigger, but also check that it is Alex's physical body colliding.  From this point, the item in question will disappear when the proper bounding box makes contact with the proper trigger.  It was a very difficult task to figure out, but it helped not only with the game progress, but also with our class workload as well.

Our final stages for this semester was to implement an attack animation and then transfer all of this data to our Phyre project that we had designed and set up in Visual Studio 2012.  To implement the attack animation or our character, we used the same method as all of our other animations, but with a special twist thrown in at the end.  Since we needed to ensure that the player makes contact to the NPCs in the game to do damage, we needed to add a separate trigger to the gamespace occupied in front of Alex when he attacks.  Once this trigger was set, we added quarries to all of the NPCs to allow them the ability to recognize when they are getting hit/taking damage.  Since we had already figured out the trigger systems in the Phyre engine and how they functioned, this task was accomplished very quickly and efficiently. 

From this point, the team just needed to export the Phyre level editor information, into the Base Phyre project we had set up to accommodate the incoming files.  Although our first several attempts had some issues with animation and triggers, we were able to make the necessary adjustments needed to have a fully functioning prototype for the due date.  

Gamma Gears in its current stage is in no way a completed title ready for release.  We as a team are aware of the work that remains before we can successfully call our title a game.  With the base framework set and our newly gained knowledge of the Phyre Engine however, we all feel that the new semester will be a productive period for all of us working on Gamma Gears.  


Sunday 8 December 2013

The Camera Systems of God of War III!


God of War III is a hit title released by Santa Monica Studios and Sony Computer Entertainment.  As the third title in the God of War series, GOW III was released back in 2010 for the PlayStation 3.  As a third person action adventure game, GOW III falls into a category that is filled with great titles from various AAA developers.  Because of this reason, the developers of the GOW series needed to differentiate themselves in a way that had not been seen in the current market by players.  The main way the developers chose to do this was through the cinematic feel they imbued in the franchise, via their in game camera systems.  Since I have already covered the basics of camera systems in games in my previous blog post, this post will focus more on how GOW III designed, tweaked and implemented into their game to create these breathtaking cinematic experiences that have helped to cement this series as one of the greatest third person action titles of all time.


At the beginning of the development of the GOW III camera system, Sony Santa Monica realized that one of the main reasons their games have been so successful, is because of the camera systems that they have implemented in their two previous titles.  For this reason, SSM wanted their third title to have the most epic feelings possible for the player experience.  To accomplish this task, four of the 120 team members working on the title were given the sole tasks of creating and implementing this intricate scripted camera system for GOW III.  The teams theory behind having a completely scripted camera system tied in with their already outstanding gameplay mechanics that had been working for the past many years.  They felt that if the gameplay in a game is solid and fluid, why should the camera be focused solely on the characters close vicinity, when it could pan across a beautiful scene while the player hacks and slashes their enemies.

This scripted camera system is unlike most traditional third person games where the player is given control of camera movement, since in GOW III the player has no influence on camera position.  For this process to be successful in game however, there must be a significant amount of time put into each cameras exact position.  For the GOW III team, this whole process started out with simple level design sheets being provided to the camera team.  With these design sheets in hand, the team is able to figure out the best locations for camera placement based on enemy locations, where the player needs to be moving towards, and unlockables that need to be visible for the player.  Once all the cameras have been implemented and playtested, the camera team sends their work to the art department.  This is where the majority of the level and camera design time is spent, as the artists are required to create these massive and epic scenes around the camera design of the level.  Before the completion of a level, the art department will send the level back to the camera team, as many cameras will need micro adjustments to work within the level being designed.  This is a very tedious process for the team, but it is necessary to accomplish that cinematic feel that everyone looks for in a GOW title.

What the camera team sees while designing a level!

Now, since a scene can have anywhere form a few, to dozens of camera locations, the design team needed a way to keep everything within the frame, while simultaneously showing the landscapes and epic designs that the artists had spent so long working on.  The first system that I discovered while learning about the GOW III camera system was the rail/dolly system they used.  This system was mainly introduced in the GOW III as the technology had advanced enough to allow for this.  Usually this system was used in long linear sections of the game.  How this system works, is that the designers would set a NURBS curve along the path they want the character to take.  A camera is attached to this curve, as well as many points that the camera can smoothly interpolate towards.  The animations are mapped to the rail as well, and during each frame, the system calculates the nearest point on the rail in relation to the character model, and interpolate the camera to that point, making for a movie style dolly effect.  Now this works great for following the character, however the designers needed to implement what they called the boom of the camera as well.  This boom was used for calculating the look vector of the camera, starting at the dolly and ending at the target position (generally the character model).  This boom would allow for panning in and out of the scene, as well as up down movement of the camera to allow for showcasing of the beautiful environments of the game, while still keeping the player in the viewport.  

The Rail Driven system used in GOW III
 

Now the system shown above works great in many of the level traversal aspects of the game that are critical to the gameplay.  However, the team needed to design a system that would work for when the main character Kratos is fighting multiple enemies in a large, wide open setting.  For the camera system to work well, Kratos needs to always be in frame and the focal point, but the team also needed to keep all enemies visible for the player as well.  To deal with this dilemma, the team implemented a weighted average camera system.  How this functions is that each character is given a weighting of "importance" in the current scene.  Generally Kratos is the highest weighted the team wanted to keep him as the central atom of the camera.  These weighted positions are all added together and then divided by the sum of all the actual weightings of each character.  This gives the team a value that they can then feed to the boom system to use as the boom target, effectively keeping every character within the viewport of the scene.  An important note is how the team gets these weights for each character (ranging from 0 - 1).  We already mentioned the base weight of the character (how important the character is), but the team also takes into account the distance weight (distance from the hero, not the camera), as well as the activation weight of each character.  This activation weight is used to smoothly transition the camera when an NPC is spawned into the scene (a high weight) or when they are killed off (a low weight).  This value helped to remove the jerking around that occured with the camera when an enemy was killed and the cameras boom target value would change drastically from one from to the other.


This system worked great when the team was testing large battles with a plethora of enemies, but when testing one on one fights, they stumbled across an issue with the weighted average system.   


As seen in the image above, the camera is too far away from the action then the designers had originally planned.  So they decided that instead of implementing the weighted average system throughout the entirety of the fight scenes in the game, they would also implement a new system which they called prioritized framing.  Along with the weighted average system, the prioritized framing system is used in the majority of the large scale battle sequences in GOW III, so I felt it was important to cover the basics of this system as well.
The main focus of this new system, was to ensure that the highest priority entity (in this case Krators) is always remaining in the frame of the scene.  From here the system would work outwards by priority level, doing its best to include as many of the less important entities as possible, while still keeping an acceptable frame distance.  The system worked on an algorithm that functioned as followed five steps to function, the first being centering the camera on the heroes location.  From here, the algorithm calculates the extents of  the lowest of the priority levels.  Now that we have these extents, we can minimally track to frame extents of the current priority level we are focusing on.  Step for is variable in time to complete, as the algorithm must work its way through each priority level completing steps two and three of the process. Once all the priority levels have been completed however, we can calculate the delta to the Azimuth and the elevation that will be needed for the booms target location.  For a visual representation, the framing would begin as this: 


And end up as this, where the red is the out of frame area with NPC's still inhabiting the space:


It was a truly ingenious fix to the problem the team was having, as they came to the realization that not all of the enemies are relatively important enough to be on screen at all times.  Also, if we remember the zoomed out screenshot shown above, the fix implemented by the team showed through as the scene now looked like this: 
Zoomed in more and framed correctly!


The cameras implemented in God of War III are truly works of art that shine through in the gameplay.  Creating these epic cinematic sequences is no small feat by a team, and the work is definitely evident when a player takes control of Kratos.  Not only does that camera work as a viewing mechanism in the game, but it also becomes the players ally at times, giving hints on different unlockables, as well as panning slightly to reveal where the player must go next.  Its a truly remarkable system that I would personally love to see carried into more games in the future.  Hopefully the God of War team can bring this technology to a next-generation game and further prove to us how versatile and amazing a camera system can make a game! 

God of War IV would be pretty nice!


Tuesday 3 December 2013

PVP Fight! Bobby Muir's GDP Portal Level

Portal 2 is a great game introduced by Valve to follow up their widely successful and extremely innovative Portal title.  The game involves the player using two portals, one orange and one blue, to solve various puzzles laid out before them.  Unlike the predecessor however, Portal 2 took to the new approach of introducing the idea of Co-op gameplay, as well as furthering the use of the steam workshop to promote the public into building their own levels.

Game Design and Production II has introduced what I believe to be one of my favourite school assignments I have come across to date.  Building a Portal 2 level for marks.  Its a great idea to promote level design and I personally found it to be an assignment with purpose, that also promotes fun.  This blog post however will not be focusing on the levels I have created.  Instead, I will be playing one of my classmates levels, reviewing and critiquing as I play.  For the assignment I have chosen Bobby Muir's classically named "Bobby Muir's GDP Portal Level" to review.  So get your Portal gun ready, and lets go on an adventure.


As shown by the screenshot above, the entrance area to the level is a little underwhelming.  In the distance I can see two droppers, with a fairly lengthy drop to where they land.  After looking above and below and seeing portable walls, my initial thought is that I will have to use a momentum jump here to complete a task.  Sure enough, after using the cube to trigger a pressure plate, an angled plate appears on the upper deck of the jump area, now allowing me to use momentum to jump with the ball over to the ball pressure plate.  It was fairly easy to figure this jump out and I felt as though it set an off tone so early in the level.  I feel as though a different location would be better suited for this jump, as it is seems very out of place and possibly added at the last minute.  


An issue I had with this area occured while trying to launch myself towards the pressure plate suited for the ball.  After gaining too much momentum, I became entrapped in the cage holding the pressure plate, shown in the image above.  Since there was no portable walls around me, I had not choice but to restart the level.  This did not make for a very pleasant start to the level at all.  A simple fix that could have been added, was a room behind the plate with a single portable wall.  This would allow for an escape path, should the player become entrapped in the cage.


Overall however, the room was pretty entertaining.  I can see what the designer was going for, making the player feel as though they are doing a slam dunk with the ball into a hoop!


The Central Hub
As I moved forward in the level, I came to what seemed to be the central hub of the level.  With two adjacent rooms, it seemed like this area was at one point meant to be the starting zone for the character, but was changed at the last moment.  In the one room, I found a room filled with tractor beams, as well as a couple floor and pedestal buttons.  I decided that since I had already solved the slam dunk puzzle, I would move into this room next.


After carefully examining what each button was responsible for, I realized that this zone was going to require careful portal placement, as well as precise timing with the buttons.  What this room require was for portals to be placed on opposite sides of the room, a portal in front of each floor button.  The player must then press both pedestal buttons as quickly as possible.  One triggers the turning on of a timed tractor beam, while the other drops the cube into the first tractor beam.  The player must then portal to the other side of the room to trigger a floor pressure plate, triggering sensitive beam that move the cube to the next position.  In one swift movement, the player must then move through the portal on to the other floor button, grabbing the cube as it falls and moving it to the final position.  From here, the cube is grabbed by the tractor beam triggered by the pedestal button earlier, and moved to the button where it comes to a rest.  Once I moved back into the main hub, I realized that this puzzle had disabled another one of the traps preventing me from exiting (The first being disabled by the slam dunk.)


This room really fell short in my mind compared to the slam dunk room introduced to the player earlier in the level.  It was quite easy to complete (only taking me a couple of minutes to solve)  and the reward is not granted to the player in an entertaining fashion like the slam dunk.  I feel as though more of the in game items could have increased the skill needed for this zone, as well as the fun factor.


Next up in my adventure was what I believed to be the final act of Bobby's level.  Since there was only one trap left before the exit was safe, I thought I would be out in no time.  I was wrong.  As I entered the next room, I noticed a few interactive items before me.  I had a laser cutting off my path, a laser cube close by, and a laser receiver high out of reach.  I also noticed that on the far end of the level, the laser receiver led to a lift that would bring me to an unknown area.  I knew that I had to somehow transfer the laser on to the wall across form the receiver to activate the lift.  So, after some carefully placed portals the lift was up and running, without me on it.  To solve this little issue, I found that placing the portal ONLY while I was on the lift was the way to go.  


The lift brought me up to a solitary pedestal button.  Being the overeager person I am, I pressed the button, only to discover that it led around the corner to the trap preventing me from leaving.  So, I headed back to the main room, only to find that the trap had reactivated before my eyes.  It was here that I was hit with the solution, and the reason as to why he had a speed gel spawner in the middle of the room!  Through the use of portals, I was able to hit the button, enter through the portal I had created from the button to behind the speed gel, and speed my way through the trap, just narrowly escaping death!  It was a great finish to the level that left me tense and excited.  


It was a very well executed level by Bobby, but there was one issue that I found.  It was too short.  It was entertaining while I player, but just as I was getting into the level, it was over.  After timing my first run I completed the level in under 5 minutes.  To help add some more depth to the level, I would suggest that Bobby add another room to the central hub.  I really enjoyed escaping the last trap, so I suggest that he utilize this throughout a whole room, creating a constant feeling of excitement and near death experiences for the player.  For his first level however, I was very pleased with how it turned out and I would definitely recommend Bobby Muir's GDP Portal Level to all who play the game.

Escape never felt so good!


Saturday 30 November 2013

Dekonstruer One: Borderlands 2


Borderlands 2 is a very unique and revolutionary style First-Person shooter, developed by Gearbox Software and published by the popular 2K Games.  A sequel to the popular Borderlands game released in 2009, Borderlands 2 was released on consoles and PC in 2012.  What made this action packed game so unique, is the different gameplay elements it incorporates into its structure, while still being a fast-paced FPS at its core.  Borderlands 2 also incorporates various elements of humour into their game, helping to break the constant action feel and add another layer to the game for the player.  One of the main features that initially grasped my attention while researching Borderlands 2, was the RPG element the developers included in the game.  It seemed like a unique feature that I really wanted to try, so I purchased the game.  I was definitely not let down with the experience.

In this blog post, I will be examining the various game atoms present in Borderlands 2, as well as explain how they fit into the game and our teachings in class.  So grab your favourite gun and lets get exploring Borderlands 2!


From Left to Right: Axton, Maya, Zer0, and Salvador


PLAYERS:

To begin on this blogging adventure, I am going to give an overview of the first game atom we stumbled across is class, players!  Before we can outline the players in the game however, we need to touch on how the actual game player interacts with the game.  Borderlands 2 is mainly designed around the concept of being a single-player/co-op experience.  Multiplayer is supported in the game, allowing 4 players in the same world, but different elements in the world suggest the game was mainly designed for 1-2 players.  This is mainly evident in the car designs of the game, as each vehicle has support for a driver and a gunner.  Although it is a great element when a co-op game is taking place, the vehicles are still important in the main story for map traversal, as well a switching from driver to gunner when situations get a little hairy.  Since the game incorporates RPG elements, such as levels and skill trees, it needs to appropriately scale the enemies when a new player joins with a vastly different level than the host.  Thankfully Borderlands 2 put a good amount of time into developing this scaling system, and it performs flawlessly, creating a great player interaction experience.  Another player element included in the game that allows for player-on-player interaction, is the arena.  The arena allows for player to test their skills against one another in a gladiator style fight to the death.  Little reward is gained from this interaction, except for personal satisfaction and bragging rights.

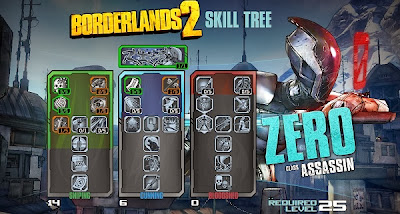
Now that we discussed how the player actually plays Borderlands 2, we need to discuss the players that the user can take control of.  Borderlands 2 is unique in the way that it allows the player to choose from one of fours separate characters, each with their own play-styles.  First on the list is Axton, the commando.  Axtons play style is fit for those who enjoy assault rifles, as well as setting up turrets and trying to outmaneuver their distracted enemies.  Maya, the siren, is for players who enjoy focusing on the elemental side of the game.  Since many weapons come with modifiers such a fire, electricity, explosive, corrosion, and slag,  players who want to heavily invest themselves into these abilities should choose Maya.  My personal favourite character is Zer0.  An assassin type character, Zer0 is great at taking out players from far distances with his sniper rifle, as well as using his duplicate body ability to distract enemies while simultaneously becoming invisible to his enemies, allowing him to sneak away.  Finally, we have Salvador the gunzerker.  Salvador is perfect for players who enjoy running into the heat of battle with two machine guns in either hand.  He is definitely the tank of the group and should be played in this fashion.  Each player earns experience throughout the game and can level up, earning skill points.  As previously stated, these points can be used to purchase new abilities and skills through the skill tree.  Currently I am level 32 as Zer0, and I still have many different abilities and skills to purchase before I am finished with the game. 


OBJECTIVES

The main objective present in the Borderlands 2 universe is to focus on leveling up your character to a point where they can fight through different difficulty stages, eventually coming to the final battle against the main antagonist, Handsome Jack.  The player is given some aid in their quest through the many different weapons introduced in the game, as well as the different modifiers and skills that can be obtained.  The secondary objective introduced in Borderlands 2 is the side quest system.  These quests do not enhance the main story, but they are useful in leveling up your character and obtaining different weaponry to deal with enemies.  There are many different types of side quests such as fetch quests, monster hunting, and prisoner rescue.  Each on has a slightly different element than the next that keeps the player involved and wondering what will come next in the questline.

Before the player can access any of the quests in Borderlands 2, they need to find the individual offering the quest.  This introduces on of the other objectives of the game, exploration.  The player must be careful when they explore however, because like many games before it, enemies scale differently in different regions of the map.  In one section, the player may be the strongest individual present, while the next offers more challenging and tougher enemies that the player can not defeat at their current level.  This pushes the player more and more towards completing side quests and exploring the map to gain enough XP to gain levels. 


RULES

Much like the objectives of the game, the rules are very centered towards the players level and the exploration of the game world.  The first and most evident rule introduced to the player is their ability set in relation to other characters.  Depending on the choice of character at the beginning of the game, the player will be given a set ability and skill tree which cannot be altered unless they have skill points to spend.  This also means that the Siren will not have the same abilities or skills that the Gunzerker will, changing the gameplay experience.  The characters also have restrictions based on level as to what guns they are allowed to wield.  This ensures proper scaling of enemies in areas, creating a nice balance in the game.  Every gun is open to every class, however each character has a certain proficiency to a type of gun and their skills reflect this, like the assassin and his sniper rifles giving bonus XP.  Exploration is also limited to current character progress in very unique ways.  Certain areas are only accessible via vehicles, which are not immediately introduced into the game.  This means the player must complete certain objectives to gain the vehicle, allowing them to move on in the game.  

The next rule does not really act as a barrier to the character, but more of a precaution.  Each level is equipped with a recommended character level that the player can view.  What the game is attempting to do here is organize the players movements and activities, while still giving the illusion of choice.  Although the character can complete these missions at almost any time, it will be extremely difficult because of the scaling of the enemies.  This guideline is well implemented and works very well as a deterrent method in the game.

When trying to define one rule-set for the game I came up with gain XP through quests - level up - explore - find new quests - gain XP through quests and so on.  
    
RESOURCES

The resources in Borderlands 2 is what really blew me away as I played through the campaign.  Not just because of the variety of types of weapons, but the shear number of guns the player can collect.  It is very uncommon to have two identical guns on the player at the same.  This is because the game really focused on random loot drops being just that, random.  To keep everything fresh for the player, the guns in the game come equipped with different stats such as damage, speed, clip size, and reload time, as well a many modifiers such as fire or slag damage.  The developers of Borderlands 2 definitely hit the nail on the head when they boasted "loads and loads of guns" in their adds for the game.  

Although they are the primarily used resource of the game, guns are not the only ones present.  The player will also come across money, health, shields, ammunition, grenades, and class modifiers.  Money allows the player to purchase many of the resources above from vending machines scattered across the land.  It is a great asset to the player during the early stages, but as the game progressed I found myself relying more on pickups from enemies that the vending machine system.  This brings me to what I think to be the most important loot item, health!  Health is found in the form of max health modifiers, on collect health regeneration and health vials which can be used when the player is low on health and needs a quick boost.  Shields in the game are equipable items that will give the player different bonuses as long as it is equipped.  Players can choose shields that fit their particular play style, as well as different situations they believe they will face in the upcoming levels.  Ammunition and grenades are valuable resources to the player and can also be purchased from vending machines, or looted off of dead enemies.  Class mods are one of the rarest resources is the game because of the power they possess.  Class mods are used to help modify the current characters stats, as well as adding additional perks to the player.  An example of this was a class modifier that increased my assassins damage, while also giving him more health regeneration over time.  This proved to be invaluable for my assassin, as he was very reliant of stealth and did not fare well in larger firefights.  With this class mod however, he stood more of a chance and my change in playstyle reflected this. 

To control resource allocation in Borderlands 2, the player uses an inventory system, disguised to resemble a backpack where all gear, weapons, shields, grenades and money is stored.  From here you can equip weapons, destroy unwanted gear, and sell valuables to increase the characters money.  Certain upgrades can be applied to the backpack to allow more space and make room for larger weapons.


GAME STATE

While examining the game states present in Borderlands 2, I was able to confidently establish that there are three game states present in the game.  The first of which is Idle/Exploration.  During this game mode, the character is free to move where they want, collect resources, explore areas and interact with NPCs.  It is the most widely used game state and helps to lead into the next state, Combat.  This game state is usually triggered when the character gets within a certain proximity to an enemy.  Once triggered, the player has three choices, kill, be killed, or flee.  Usually the player stays within the first option, but on occasion fleeing is the only choice offered.  To switch back to the idle/exploration gamestate, the player must have no enemies aware of their presence to allow for freedom of movement.  

Finally we come upon the most unique of the three game states inescapable boss fights.  This game state is very unique in that it is similar to the combat state, but fleeing from the battle is removed form the choices.  These fights are usually triggered at the end of a stage and take place in an arena like setting.  The player can choose to leave the level at any time up until the boss, but once triggered the boss fight must end with either the boss dying or the player.  Only then will the player be allowed to leave.  

These rapid changing of state helped to keep me as a player interested in the game, giving me moments of action as well as moments of down time to relax.


INFORMATION

Information in Borderlands 2 is all dependent on the characters current skill level, current location, and characters that they have met along the way.  The main form of providing information to the player however, is through the characters and quests that must be undertaken to progress throughout the game.  This information can be anything from a characters location, to where the player will find the next boss that will open up a new region of the game world.  This information however can be restricted to players in some cases.  Certain characters will only provide information to the player if they have completed a certain quest, or have reached a set skill level threshold.  This helps with keeping the player on a set game path, while again allowing for exploration in areas where it is needed.  

Another form of giving information on the games world and characters is through the use of hidden recordings.  When discovered, the player can listen to little clips of audio from characters such as Handsome Jack and the Guardian Angel.  This helps to provide backstory to the main campaign and gives the player a reason to explore and hopefully track down all of these recordings.  

SEQUENCING

The sequencing in the game can become at times very repetitive, and in some cases boring.  The game follows a very specific set of mission rules and they all function in a similar way.  Usually this follows the trend of go to this location, kill all the enemies, collect the loot, and find the boss and kill them.  Upon completing these tasks, the player will be rewarded with money, XP, and in some cases a new weapon or resource for their inventory.  The players current experience will influence which missions are available, but upon receiving them they usually function the same way.  There is slight variations in missions, such as fetch quests and prisoner rescues, but they all function around the enter area kill everyone mindset.  To help keep these fights fresh however, the game adds different location styles, enemies, and vehicles that the player can use to fight.  Thankfully these were added, as the game would have become very dry without other elements to boost the entertainment.

PLAYER INTERACTION

The main form of player interaction in the game is to complete quests with a friend while in the co-op game mode.  To help keep it gameplay fair, friends of lower levels can be scaled up to help their friends complete missions, without getting killed all the time by higher leveled enemies.  To keep the co-operation aspect healthy in the game, all money and XP is distributed evenly to teammates.  Weapons and other items can also be traded among friends to make for an interesting bartering system between friends.  The only issue I had with the interaction I had was with a friend who was of a higher level than myself.  Since he was further on in the game, I had many story points spoiled for myself and it felt useless playing through them a second time on my single player campaign.  If the development team had implemented just co-op campaigns, this issue could have been solved and added to the interaction and gameplay experience. 

THEME

The theme that I took away from Borderlands 2 was that of a hilarious wasteland teeming with different life.  The game is very gritty in style and looks, but when the game is examined more closely, all of the comedic elements are revealed.    The artstyle of the game also helps to further introduce this decrepit wasteland style, while the cel-shading graphics help to increase the dark and dank aspects of this decaying landscape.  Although it pushed some players away from the game, it really helped to bring me in and I could not have been happier with the experience it portrayed. 


SETTING

The setting of Borderlands 2 takes place on the planet of Pandora.  In Borderlands 2 the player is introduced to 4 new vault hunters out to discover the second vault and gain its treasure.  However, their plan is disrupted by Handsome Jack, turning their mission from adventure to revenge.  With the help of Claptrap and the Guardian Angle, the player must locate the Resistance, get them to join the cause, and rush against Handsome Jack, possibly finding a vault key in the process! This will not be easy however, as Pandora is filled with an assortment of bandits, psychos and nasty creatures that will attempt to kill you at every turn.  


Borderlands 2 is just further proof that when game atoms are successfully implemented in a cohesive fashion, a game can give great enjoyment to the user.  This game is one of my favourite FPS' and it was a really interesting experience getting to pick it apart piece by piece and see all the elements involved in creating this classic title.


Stop, Camera Time!


So for today's little blogging adventure, I have decided that I am going to be covering the topic of cameras in Games!  Cameras play such an important role not just in allowing the player to see what is occurring, but also with setting the mood of the game and adding another layer to the immersion.  Now there are a few different types of cameras that can be used for different games and I will be getting to those shortly, but first I am going to give a little explanation to what a camera is and how it fits into our game space!

By now, you should know that a camera in a game does not really function in the same way that a camera in real life does.  It does not record images onto film or digitally and allow the player to pull them up for their enjoyment at a later time.  Instead a camera creates a technical window into which our player can view the action that is occurring on the screen.  Now, even though many of the games that we play our classified as 3D, we still are not able to play them in a 3 dimensional space. (Unless of course you can afford a 3D TV!)  It is the cameras job to capture the 3D action occurring in the game world, and display it to the player on the screen in the form of a 2 dimensional image.  In a way, this makes current generation 3D games feel as though they should be called 2D games with very nice 3D models!

This is done by the use of creating a viewport that the player can look through to view the game in front of them.  In a perspective camera, much like the ones we use in Maya while modeling our characters, we are able to view our images in what is called the frustrum.  The frustrum of a camera is the distance between the near clipping plane and the far clipping planes.  For those who may be confused, a near clipping plane will not load any objects past its threshold (set distance away from the camera), while a near clipping plane will not load any objects in the viewport that are closer than its threshold.  Now, in a renderable scene there must also be an aspect ratio.  This ratio is determined by setting the width of a scene, as well as a height, then dividing the two in this order.  Since cameras work in the way they do, with a near and far clipping plane, objects that are closer to the far clipping plane will appear smaller than objects closer to the near plane.  This is how we create distance on screen and a sense of 3 dimensions!  The other form of camera used generally is called an orthographic camera.  This camera does not create a sense of distance and is therefore generally unpopular in gaming.

A classic perspective Camera
Now that we know that it is necessary for a camera to be involved for 3D images to be displayed with distance on screen, we can understand why its so important for games!  When it comes to cameras, a developer has a very important decision to make.  How will my camera system work?  There are more options than one would think, from the simple single camera system that follows the player from A to B throughout the entirety of the game, or will my game have many cameras, making the player feel as though they are immersed in a movie.  This important decision can not only impact how the player will play the game, but also the feelings and emotions they will have as well.  For this reason, camera choice can not be taken lightly.  So, before a designer can choose how they want there camera to function, they must first choose which camera type they would like to use, fixed or dynamic.

When I think of fixed cameras, there is really only one game that stands out in my mind, and that is the God of War franchise.  I am not sure if this is by my own personal preference, or if this is the result of three years of lectures with Dr. Hogue.  Even if this is not by my own choice, I can not argue with my professor on his choice, as the GOW series has a fantastic camera system.  This is because the camera is not meant to only be focusing on the main character constantly.  In my opinion, this camera system is best used for creating a very cinematic and epic gaming experience for the player.  The camera does not follow the player on a 1-1 character to camera movement basis, instead the player works inside the camera interpolates around the screen at its own pace.  The character is always kept in the frame, while still giving the player the sense that the camera is mounted on a swivel in another area, capturing the most cinematic of shots.  The cutscenes follow this trend as they are laid out in a way that the player feels as though they are watching a movie and they are the main protagonist.

This can be seen as Kratos is not perfectly centered like most camera systems.
These systems are beautifully executed in the game, but they are not a hard concept to grasp when some thought is put into the idea.  A camera such as this could be set up in Maya with the use of locators in different positions around the current level.  These could then be exported and simple interpolations could be implemented between each of the locators.  As the players moves about the level, the camera will smoothly pan from one location to the next, giving a very cinematic and cutscene like feeling to the levels.  Although fixed cameras do have their perks, many games have been implementing the second form of camera systems, Dynamic cameras.

These cameras, unlike their counter-parts, are definitely harder to understand when it comes to implementing them into games.  As discussed earlier, dynamic cameras are those that follow the player in a 1-1 manner.  If the player moves forward on the X axis, the camera will also move forward on this axis.  Since this is the case, a designer of a game has to ensure that this camera style will fit into the mood of the game they are trying to portray.  If a cinematic feel is what they are after, they should probably stick with the fixed system.  This camera style does have the advantage of putting the player directly into the action of the character however through the use of the first person camera.  The first person camera is great for games such as where the player wants to take on the role of an entity in the game, as the camera view is through the eyes of that character.  This is relatively easy to set up, as the cameras position is centered on the head area of the character, looking in the same direction that the eyes would be.

Through the eyes of the hero - First Person View


Setting up a camera location for the other form of dynamic camera, third person, is another story.  The third person camera view has the player from an over the shoulder perspective.  Most or all of the characters body is in view, and generally allows the player a more in depth view of the space the character is holding in the world.  This can be difficult to implement into games however, as the designers have to be very aware that the camera is actually slightly behind the players physical entity in the worldspace.  This can cause problems when a character runs toward the camera, while simultaneously running towards a wall, causing the camera to malfunction or show the character through a wall.  These are the challenges facing those who decide to implement a third person camera. 

Many fixes have been implemented into games over time however, and some work much better than others.  A way that has always thrown me off personally is having the camera reset to the behind the back position, upon coming into contact with a wall, while still allowing the character to keep running.  This always disoriented me, and made for a very un-enjoyable gaming experience.  A successful fix for this problem involved having the camera travel upwards along the wall so that the player was looking down at the character.  This doesn't have the disorienting effect that the other method has and it still allows the player to keep their thumbstick pointed in the same direction. 

Hopefully this blog has helped to outline the importance that cameras carry when being implemented into a game.  Although a bad camera system may just show the player what is occurring on the screen, I believe that a great camera system can involve the player on a whole new level, making them feel apart of the action taking place in front of their eyes.


Thursday 28 November 2013

Scripting: The What and the Why.


Recently in one of our lectures presented by Dr. Hogue, we went over an exciting topic that is sure to benefit our game creation dramatically.  This topic was of course, scripting!  He went over the various uses of scripting, the different types of languages used for scripting, and how we as students will be able to include scripting into our games to save time and effort.  For this blog post, I will first be outlining what scripting is, then outlining some of the scripting languages used currently, and finally, finishing off with how our GDW group will be using scripting to our benefit!

Up until this point in our education, coding in C++ has been a pretty straight forward task.  We write the code in our .cpp files and .h files, then compile the program and run it to see if it functions.  It is a system that has worked for all these years, even though it is inefficient.  If a small change is made in the code and the programmer wishes to test it, the project must re-compile all over again to see if the change was a success.  For smaller projects, this time does not seem like large burden to the programmer, however, when a team is assembling a large project (such as our games), having to re-compile after each change can mean substantial amounts of down time.  To help combat this problem, scripting was introduced to the mainstream programming scene.

Scripts in themselves are generally small text files written separately from the main code base.  These small texts are then taken and compiled at run time, outputting some option for the user.  This allows for the rapid development of minor changes in the project, while also making the engines core behaviours simpler for the programmer. For a non-programming type like myself, this also meant that I could write code in scripting language, which I found much easier to understand and interpret for my small tasks.

Now before a script can be written, the user must realize that there are two different types of scripts that can be written.  These scripts are:

Interpreted

Interpreted scripts are usually intended for smaller tasks, as the process of "sticking together" a succession of compiled programs, is not very ideal for larger projects.  Interpreted scripts is a program where a logically sequenced series of operating system commands are handled piece by piece, using a command interpreter.  This interpreter does this, by going through the scripting code line by line, examining what is occurring at each stage.  These lines are then parsed, interpreted using the operating system and executed as they are passed over.  This is why larger systems generally stray away from using the interpreted scripting method.

Compiled

Compile scripts are what programmers use when they need to handle a larger task, but still do not wish to compile the project as a whole because of time constraints.  Similar to how C++ functions, for this style of scripting to function, we need to use a compiler that creates bytecode from the written script.  This bytecode that is written in a special format, in which the interpreter can load the bytecode and understand what is occuring in the script.  From this stage, the bytecode in loaded into a virtual machine that is residing in the script application.  While this bytecode is being loaded in, the project can run in a piece by piece format, saving the programmer their most valuable resource, time!

Since we had all of the benefits of scripting sitting in front of us, we as a Studio decided that using scripting in our program would be the most efficient method of completing this project on time.  Without the fear of needing to make large changes to the code to justify re-compiling, we as a group figured we could have a semi flexible game idea that allowed for constant modification and testing when a new idea was formed.  The only issue we had was which scripting language would we want to use?

Now, we planned on using scripting to cover the majority of our workload.  This would include using scripting for things such as previewing character animations, testing level design layouts and concepts, as well as previewing different mechanics for our game and how they would function in code.  Since we knew this all had to fit within the abilities of what our scripting language was capable of, we needed to make the smartest decision.  In class, Dr. Hogue outline many of the different languages used today.  The list was as follows:
  • Lua
  • Python
  • GameMonkey
  • Squirrel
  • AngelScript
  • SpiderMonkey
  • Ruby
  • Gmae Maker Language
  • Unreal Script
Needless to say, we had a tough choice to make.  Since our programmer James was going to be using the language the most, we first and foremost wanted to be sure that he was comfortable working with the language we chose.  So, after careful deliberation and a some time looking into each language, we all settled on the decision to use the Lua programming language.  
   
Even though it is not the most exciting Logo
Since we were starting with a fresh new language that we had little to no skill in, we decided that our first task should be to find suitable knowledge sources to use.  As it would turn out, the Lua website provided many of the resources we needed.  In their documentation section, the website provides many sourced written documents, including topics such as the implementation of Lua and the design of the programming language as a whole.  These sources were a great benefit for us, as it gave the team a starting point to work from.  When it came to specific problems we ran into with production involving Lua, Youtube came in to save the day.  Many users have uploaded visual demos, that helped us to work through our problems, when the documentation did not cover the issue, or was too difficult for us beginners.

An example of an issue our team came across very early on in the use of Lua, was the lack of libraries being included in the Lua pack itself.  Without these libraries, there would really be no use in using Lua, as it would not properly run and compile.  So, the team was faced with yet another choice.  Do we attempt to create our own libraries, or do we seek out a 3rd party one to download?  While discussing this among the group, James was able to put the issue to rest by locating a pack of Lua libraries that would successfully run and compile our scripts.

Although it seems like a lot of work to learn and implement scripts into our games for the year, it has truly proven to be an invaluable resource.  Not only has it saved the team a substantial amount of time compilation wise, but it also allows us to rapidly implement, test and either scrap or keep new ideas for our game.  The benefits have far outweighed the cons and I am greatly that this knowledge was included in the teachings for our Game Engines class.

Tuesday 26 November 2013

My Favorite Game Engine... The Source Engine!


For as long as I can recall in my gaming history, I never really took an interest into how game engines worked.  As a child, if I could throw a game into my computer and have it run at 20 Fps, I was a happy camper.  Since I grew with a sub-par PC at home, I found it difficult to run a variety of the higher end games that always looked so great on my friends gaming PC's.  I had lost all hope for running one of these graphically intense games, until in 2005 I picked up Half-Life 2 from a designer called Valve.  When I popped the game into my CD drive, I was stunned at the look of the game and how well it was running on my PC!  At this point, I wanted to know what was so special about this game that it could run so smoothly on my not so great system.  This hunt led me to an article on the at the time year old Source engine.  I instantly fell in love and began picking up any game I could find that was using this great technology.

As you may be able to guess, I still love the Source engine today, so I found it fitting that I should do a blog post on an Engine that I still use to this day.  During the upcoming blog post, I am going to be outlining a bit of the history behind the source engine, some features relating to its design and use, as well as what Valve has planned for this incredible technology in the future.

I still can not believe I could run this on my machine!
A HISTORY OF THE SOURCE ENGINE

So before I get into the technical aspects of the Source Engine and the incredible features contained within it, I thought that it would be fitting to give some background on the engine and its creation.  The first deployment of the source engine was in 2004 when it was released in tandem with Counter Strike Source.  Players were amazed at the optimization of the engine and how well the game performed, even on low to high end systems.  Released shortly after CSS was Half-Life 2, which featured even more realistic character models, animation, facial movements and ragdoll physics.   Valve was being praised for this new source engine, however it would not have been possible without the GoldSrc engine, which in itself is a very heavily modified version on the Quake Engine from years past.  This use of the GoldSrc engine can even been seen in code snippets from both Half-Life 2 and CSS.  Although Valve did give credit to the GoldSrc engine, initially referring to their engine as the GoldSrc and Source engine, it was in 2003 at an E3 conference where the engine name "Source" became the one officially used by the public and Valve employees.  Over the years, the designers and programmers at Valve have taken on the task of replacing the original GoldSrc engine code, with their own better optimized code for current consoles and PC hardware.  

Since the source engine is an ever changing staple of Valves company, they needed a way to constantly be updating these features for the players, to always improve on their gaming experiences.  To accomplish this task, Valve decided to use their already successful steam online digital distributer to constantly feed the players with new updates as well as fixes that may be required for certain games.  This has allowed the Source engine to constantly evolve, and even be used in current upcoming next generation game titles such as Titanfall set to be released in 2014.  Now that you know a nice chunk of the history behind the engine, lets get into more of the technical aspects and what this engine is capable of.

Not a bad looking Logo either!

THE MEAT AND POTATOES OF THE ENGINE!


Since the creation of the Source Engine back in 2004 many different technologies have been developed for implementation in the engine, as well as removed when they have become outdated.  What I am going to be discussing was what is currently present in the Source Engine, thanks to an information licensing sheet released about the engine.  To start, I thought I would touch on some of the assets included in the Source renderer.  These features include Direct 3D rendering on PC's, Xbox systems, thanks to the multiple CPU cores included in all of these systems.  HDR or High Dynamic Range rendering is also included, as well as 3D bump mapping on all models in the game.  For rendering the lighting in their games, the Source engine uses pre-computed radiosity lighting as well as dynamic shadow maps on character and object models.  My favorite part of the engine, the physics engine, was derived from the classic physics engine that has been in use for years.  This physics engine is network-enabled and very bandwidth efficient to not disrupt players.  Among these major technologies included, the source engine contains water flow effects, dynamic 3D wounds, cloth simulation, an advanced particle system as well as a whole host of other features that are exciting to discover.  

One of the key areas of the engine that I really wanted to focus in on was the animation of characters faces and actions, as well as the material system included.  To start though, I am going to outline some of the key ways that Valve created these life like characters that we all fell in love with.  Using the source engine, the designers were able create characters with believable character traits, as well as interactive and intelligent responses to character movements and actions.  The Source engine a realistic eye system included, which allows the NPCs to focus on either the character or different objects, not just parallel views, while also adding realistic eye bulge that is present in humans.  The simulated muscularity of the characters provides emotions in speech in body language, while the Faceposer included can also be used to craft more dramatic emotions and lip syncing.  Another animation asset included is the skeletal and bone system, as well as the layered animation system.  When used together, these two features can synthesize complex animations out of several pieces of data.  Now we come to the material system used in the source engine.  Valve really took everything into account when creating this system, since instead of traditional textures each object is given sets of materials to define what the object is made of and what texture to use.  These materials are important, as they define what the object will do when fractured, dragged along a surface, as well as its mass and buoyancy.  It is a very interactive system to use and can even have effects on NPCs or objects, such as mud slowing a character, or ice causing them to slide.  I was really intrigued by how this system works, and it shows through in the games how well it works.


Since we have discussed some of the background elements of the engine that the players know is there, but don't pay a second though too, lets discuss some of the features we interact with all the time.  These features of course are the multiplayer, AI, the sound, and the UI that is implemented in the games using the Source engine.  Since we are touching on the multiplayer first, I thought it would be fitting to discuss how robust the networking code of the Source engine is, as it allows support for up 32 players in both LAN and internet based play.  Not only this, but a complete toolset is included to for use by level designers, character animators, and the creation of demos for players to experiment with.  Since collision can sometimes run into some faults via multiplayer play, the source engine includes a prediction analysis system, that is used for interpolation collisions and hit detections of players and objects.  This makes for a much smoother online play experience for all players.  Having tested it myself many times, I can say that the multiplayer in the Source engine has worked flawlessly for me over many different games and consoles.  

The AI in the source engine is what truly helps to bring many of Valves cult classics to life.  This is evident in games such as the Half Life series, where the player is able to form strong meaningful bonds with characters such as Dr. Kleiner and Alyx Vance.  This is thanks to the advanced AI included in the Source engine that allows for these meaningful interactions.  This AI includes features like graphical entity placement for level designers to quickly control the game environment, sophisticated navigation to allow characters to run, jump, climb, and take cover.  The AI also use senses to see, hear, and smell, as well as determine whether an entity is friend foe or just an object.  The one feature of the AI that truly stuck out to me however, was the squad AI.  Upon finding survivors, they will join your party and behave like a real military unit.  The characters operate together, knowing when to advance, take cover, suppress the enemy and retreat to different cover.  It was a really immersive feature included in the source engine and helped to further the realism of the game. 

The Source engine is fully supportive of 5.1 surround for up to 4 speakers.  A high quality 3D spatialization effect is also included to give the character a sense of distance and direction of the enemies.   The engine also has a pre-authorized doppler effect included, as well as support for users to stream audio on any wave.  The audio really helps to bring to life the fights, especially when alien weaponry is involved in games such as Half-Life 2!

Finally we come to the user interface of the source engine.  The source engine uses a very simplistic approach when it comes to their UI, however it successfully gets the job done.  The main area where the UI's simplistic nature works well is in the multiplayer server browsing area.  The server browser displays all of the currently active servers for the player to choose from, as well information pertaining to each.  From this screen the player is able to filter out different settings, pick favourites, and see past servers to help with their choice.  The messenger in the source engine can also be used here for chatting with friends, as well as joining servers that friends are currently playing in.  Its a great interface and although I struggled with it at first, I now know why the Source engine includes this UI in all of their games.


WHERE IS THE SOURCE ENGINE HEADED

Now as I have previously mentioned, the source engine is constantly being updated with new content to help further the gamers experience, however there are a few different technologies Valve is working on to improve Source.  The first of these is the development of new content authoring toolsets.  Since Valve has received a heavy amount of criticism over their Source SDK toolset, in regards to being outdated and too difficult to use, Valve has invested many of their assets into creating these new sets.  The new toolsets will allow content to be created faster and more efficiently as even Gave Newell himself has called the curent tools "sluggish and very painful to use"

There have also been confirmation as to Valve creating a brand new engine which they have named the "Source 2 Engine".  The engine has been in development for some time now and currently Valve is waiting for an appropriate title to launch the engine with, similar to how they launched Source with the Counter Strike Source title.  

The final piece of technology that Valve has been attempting to integrate into their Source engine is the Image-Based Rendering system.  The system was due to release back in 2004 with the Half-Life 2 game, however it was struck of the list before the release was set.  Currently Valve is attempting to integrate this feature into their Source engine, as it would allow support for very large scenes that currently are not possible with polygonal objects.


As I stated before, Valves Source Engine is still my favorite engine after so many years of gaming.  The ease of access, the modding capabilities and the optimization are all what give players like myself such a joy from using it.  I can not wait to see what Valve has in store for this engine and what exciting technologies and games they will be able to release in the coming years.  

Half-Life 3 perhaps?